Nuitrack 1.5.0
3D スケルトン トラッキング ミドルウェア
 すべて クラス 名前空間 関数 変数 Typedefs 列挙型 列挙子 プロパティ イベント グループ ページ
インタラクティブなマルチタッチ ギャラリーを作成

このチュートリアルでは、ジェスチャーで操作できる仮想ギャラリーの作成方法を紹介します。ギャラリーには、プレビュー モード (1つのページに複数の画像を表示) とビュー モード (画像をクリックすると全画面モードで表示) という2つのモードがあります。ギャラリーの操作は、片手、または両手 (マルチタッチ) を使って、クリック、上へスワイプ、左へスワイプ、右へスワイプなどのジェスチャで行います。このプロジェクトには、Nuitrack とセンサー (サポートしているセンサーの一覧は、Nuitrack Webサイトを参照) が必要です。

このプロジェクトを作成するために必要なものは以下の通りです。

  • Nuitrack Runtime と Nuitrack SDK
  • サポートされているセンサー (サポートしているセンサーの一覧は、Nuitrack Webサイトを参照)
  • Unity 2019.2.11f 以上

完成済みプロジェクトは、 Nuitrack SDK: [Unity 3D] > [NuitrackSDK.unitypackage] > [チュートリアル] > [HandTrackerox]です。

Ugallery_15.gif

シーンのセットアップ

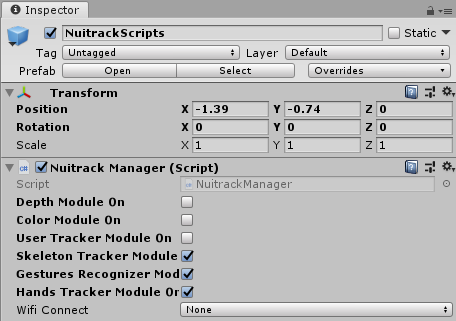
  1. NuitrackScripts プレハブを Nuitrack SDK からドラッグ アンド ドロップし、[NuiTrack Manager]セクションの必要なモジュールであるスケルトン トラッキング モジュール (ユーザーのトラッキング)、ハンド トラッカー モジュール (ユーザーの手の検出)、ジェスチャ認識モジュール (ジェスチャ認識) にチェックを入れます。

    Ugallery_1.png
    このプロジェクトに必要な Nuitrack モジュール

  2. 新しいスクリプト、Pointer.cs を作成します。ギャラリーの操作を行うポインターの設定を保存します。Start メソッドで、onHandsTrackerUpdate イベントを登録することで、ユーザーの手の状態に関するデータを受け取ることができます。

    private void Start()
    {
    NuitrackManager.onHandsTrackerUpdate += NuitrackManager_onHandsTrackerUpdate;
    }

  3. OnDestroy メソッド内のこのイベントの登録を解除するなら、 別のシーンに切り替えた際に、無効なレファレンスによる問題を防ぐことができます。

    private void OnDestroy()
    {
    NuitrackManager.onHandsTrackerUpdate -= NuitrackManager_onHandsTrackerUpdate;
    }

  4. NuitrackManager_onHandsTrackerUpdate メソッドで、コントロール時に、右手か左手のどちらを使用するかを指定します。ユーザーの手のデータの処理を追加することで、該当するポインターを動かすことができます。ユーザーが手を握って拳になったら「クリック」イベントが起こるよう定義します。手がアクティブではない場合には、隠されます。

    private void NuitrackManager_onHandsTrackerUpdate(nuitrack.HandTrackerDatahandTrackerData)
    {
    bool active = false;
    bool press = false;
    foreach (nuitrack.UserHands userHands in handTrackerData.UsersHands)
    {
    if (currentHand == Hands.right && userHands.RightHand != null)
    {
    baseRect.anchoredPosition = new Vector2(userHands.RightHand.Value.X * Screen.width, -userHands.RightHand.Value.Y * Screen.height);
    active = true;
    press = userHands.RightHand.Value.Click;
    }
    else if (currentHand == Hands.left && userHands.LeftHand != null)
    {
    baseRect.anchoredPosition = new Vector2(userHands.LeftHand.Value.X * Screen.width, -userHands.LeftHand.Value.Y * Screen.height);
    active = true;
    press = userHands.LeftHand.Value.Click;
    }
    }
    }

  5. Pointer.cs スクリプトでは、手と RectTransform のためのフィールドに加え、背景、デフォルト スプライト、「クリック」スプライトを追加します。

    using UnityEngine.EventSystems;
    using UnityEngine.UI;
    public class Pointer :MonoBehaviour
    {
    public enum Hands { left = 0, right = 1 };
    [SerializeField]
    Hands currentHand;
    [Header ("Visualization")]
    [SerializeField]
    RectTransform baseRect;
    [SerializeField]
    Image background;
    [SerializeField]
    Sprite defaultSprite;
    [SerializeField]
    Sprite pressSprite;
    }

  6. 手の状態に応じて、ポインターが表示、もしくは隠されます。握った手を視覚化するには、「クリック」スプライトを使用し、画像要素で置き換えます。

    background.enabled = active;
    background.sprite = active && press ? pressSprite : defaultSprite;
    注意
    詳細については、Microsoft Webサイトのオペレーターに確認ください。
  7. Unity では、ギャラリーを表示するための[キャンバス]を作成します。[キャンバス]では、ポインターとして表示する右手と左手の画像を作成するために、[UI] > [画像]を使用します。カメラのセットアップをします。[カメラ] > [レンダリング モード] > [Screen Space Camera]、そして [Render Camera] > [メイン カメラ]を選択します。

    Ugallery_2.png
    キャンバスの設定

  8. Pointer.cs スクリプトに、左手 (LHand) と右手 (RHand) の画像をドラッグ アンド ドロップします。
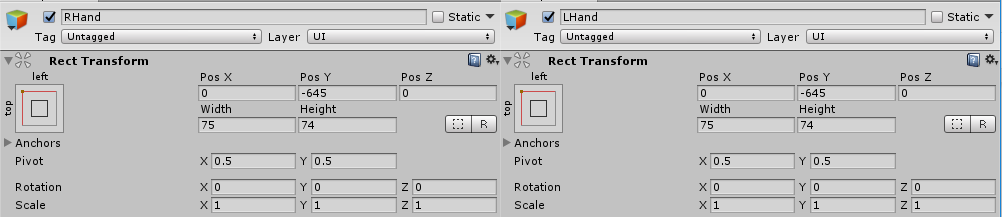
  9. 画像 (手の視覚化に使用されているスプライト) を右手 (RHand) と左手 (LHand) にドラッグ アンド ドロップします。次の設定を行います。[長方形変形] > [左上アラインメント]コマンドを使用して、ポインターの起点の座標が左上の角になるように設定します。

    Ugallery_3.png
    左手と右手の設定

  10. Unity で右手の設定を行うため、[現在の手] > [右]で、[baseRect]にレファレンスを付けます。左手についても同じことを行います。[画像]要素に対してのレファレンスを作成するために、[背景] > [画像]コマンドを使用します。「押す」ポインターのスプライトを設定するにために、[押すスプライト] > [HandDown]を設定します。

    Ugallery_4.png
    ポインターの設定

  11. プロジェクトを実行します。ポインターが表示され、ユーザーの動きに合わせて移動します。[押す]スプライトは、ユーザーが手を握った時に表示されるはずです。
Ugallery_5.gif
ポインターの移動

ギャラリーの作成

  1. Unity で、ギャラリーのコンテンツをスクロールするためのコンテンツを[キャンバス]に追加するには、[GameObject] > [ScrollView]を使用します。ScollView 設定を編集します。[Scroll Rect] の[Vertical]のチェックを外します。Scroll Rect に関して、アラインメントをエッジに沿って設定した場合、キャンバスのエッジまで引き伸ばされます (画面のサイズを変更しても、全画面表示になります)。

    Ugallery_6.png
    スクロールビュー設定

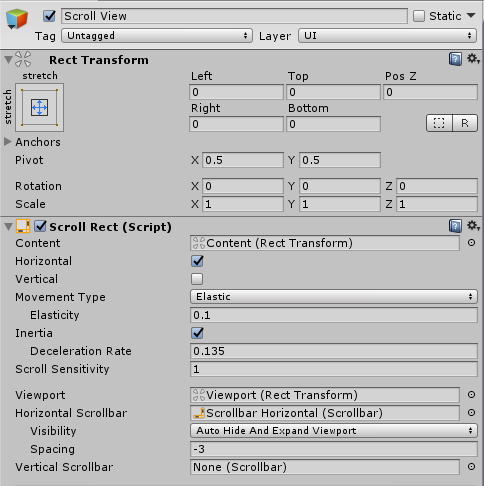
  2. Content については、左上アラインメントを設定した場合、座標の起点がスクロール枠の左上に固定され、枠が左右に動くことはありません。

    Ugallery_7.png
    コンテンツの設定
    注意
    ここでは、[上下]を無効にして、ギャラリーを左右にのみスクロールできるようにしています。しかし、上下スクロールのみ、または上下左右のスクロールが可能なギャラリーに設定することもできます。
  3. 新しいスクリプト、GalleryControl.cs を作成します。このスクリプトでは、ギャラリーの設定やコントロールの種類を定義します。ギャラリーの画像表示モード、コントロール要素、追加の設定のフィールドを追加します。ギャラリーは、画像のプレビュー モードとビュー モードの2種類をサポートしています。

    public class GalleryControl :MonoBehaviour
    {
    enum ViewMode { Preview, View };
    ViewMode currentViewMode = ViewMode.Preview;
    [Header("Visualization")]
    [SerializeField] ScrollRect scrollRect;
    [SerializeField] Sprite[] spriteCollection;
    [SerializeField] RectTransform content;
    [SerializeField] GameObject imageItemPrefab;
    }

  4. ギャラリーのビュー モードでページに表示される行とカラムの数を設定します (0以上の数であれば、自由に設定できます)。ページの大きさ、ページの数、プレビュー モードでの画像の大きさを保存する変数を設定します。

    [Range(1, 10)]
    [SerializeField] int rowsNumber = 3;
    [Range(1, 10)]
    [SerializeField] int colsNumber = 4;
    Vector2 pageSize;
    int numberOfPages = 0;
    Vector2 defaultSize;

  5. Start メソッドで、ギャラリーを写真でいっぱいにします。

    void Start()
    {
    pageSize = new Vector2(Screen.width, Screen.height);
    defaultSize = new Vector2(Screen.width / colsNumber, Screen.height / rowsNumber); // calculate the size of an image in the preview mode
    Vector2 halfAdd = new Vector2(defaultSize.x / 2, -defaultSize.y / 2);
    int imagesOnPage = rowsNumber * colsNumber;
    numberOfPages = (int)Mathf.Ceil((float)spriteCollection.Length / imagesOnPage); // divide the total number of pictures by the number of pictures on one page and round it up
    int imageIndex = 0;
    for (int p = 0; p < numberOfPages; p++) // iterate over the pages
    {
    int imagesOnCurrentPage = Mathf.Min(spriteCollection.Length - p * imagesOnPage, imagesOnPage); // set the number of images on a current page
    for (int i = 0; i < imagesOnCurrentPage; i++) // fill the current page with images
    {
    // Create an image object from the prefab and make it child to the content
    GameObject currentItem = Instantiate(imageItemPrefab);
    currentItem.transform.SetParent(content.transform, false);
    // Calculate and specify the position on the content
    RectTransform currentRect = currentItem.GetComponent<RectTransform>();
    currentRect.sizeDelta = defaultSize;
    float X = pageSize.x * p + defaultSize.x * (i % colsNumber);
    float Y = defaultSize.y * (i / colsNumber);
    currentRect.anchoredPosition = new Vector2(X, -Y) + halfAdd;
    // Drag-and-drop to the sprite
    Image currentImage = currentItem.GetComponent<Image>();
    currentImage.sprite = spriteCollection[imageIndex];
    imageIndex++;
    }
    }
    content.sizeDelta = new Vector2(Screen.width * numberOfPages, Screen.height); // set the content size
    }

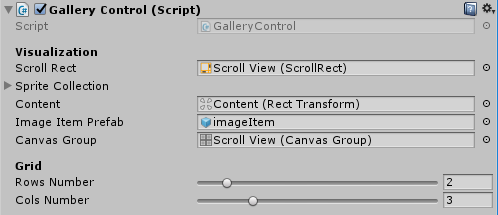
  6. Unity で、GalleryControl.cs スクリプトを[キャンバス]にドラッグ アンド ドロップします。ドラッグ アンド ドロップ先は、[Scroll Rect] > [Scroll View, Content] > [コンテンツ]です。画像の画像オブジェクトを作成するために、[コンテンツ] > [ゲーム オブジェクト] >[UI] > [画像]コマンドを使用します。プレハブを作成し、画像オブジェクトをプレハブにドラッグ アンド ドロップします。このプレハブをさらに、GalleryControl にドラッグ アンド ドロップします (Gallery Control > Image Item Prefab)。[ギャラリーコントロール]設定では、表示画像の行とカラムの数を設定します。

    Ugallery_8.png
    ギャラリー コントロール設定
    注意
    次のGIFは、簡単かつ素早く画像をギャラリーに追加する方法を紹介しています。
Ugallery_9.gif
ギャラリーをたった数秒で写真をいっぱいに!

ページをめくる

  1. ギャラリーに、ページをめくる機能を追加するには、ページをめくる速度、ScrollRect 要素のオフセット、現在のページ番号の値を含むフィールドを追加します。

    [Header("Scroll")]
    [Range(0.1f, 10)]
    [SerializeField] float scrollSpeed = 4f;
    float scrollStep = 0;
    int currentPage = 0;

  2. Start メソッドの GalleryControl.cs スクリプトで、NuitrackManager_onNewGesture メソッドをNuitrackManager 要素の onNewGesture イベントに登録すると、ジェスチャのイベントが戻ってきます。OnDestroy メソッドで、このイベントの登録を解除します。

    void Start()
    {
    NuitrackManager.onNewGesture += NuitrackManager_onNewGesture;
    }
    private void OnDestroy()
    {
    NuitrackManager.onNewGesture -= NuitrackManager_onNewGesture;
    }

  3. Start メソッドでスクロールの段階を計算します。

    if (numberOfPages > 1)
    scrollStep = 1f / (numberOfPages - 1); // 1/(n-1) given that the Scrollbar takes values from 0 to 1 and one page is already displayed

  4. まず、NuitrackManager_onNewGesture メソッドのギャラリー モード (ビュー/プレビュー)を確認します。その後、ジェスチャ タイプを定義し、その結果次第で、現在のページ数のインクリメント、またはデクリメントを行います。ページ数が範囲内に収まるよう、範囲を 0 から Mathf.Clamp 関数の総ページ数に設定します。

    private void NuitrackManager_onNewGesture(nuitrack.Gesture gesture)
    {
    switch (currentViewMode)
    {
    case ViewMode.Preview:
    if (gesture.Type == nuitrack.GestureType.GestureSwipeLeft)
    currentPage = Mathf.Clamp(++currentPage, 0, numberOfPages);
    if (gesture.Type == nuitrack.GestureType.GestureSwipeRight)
    currentPage = Mathf.Clamp(--currentPage, 0, numberOfPages);
    break;
    }
    }
    注意
    Nuitrack がサポートしているジェスチャは、手を振る、押し出す、上にスワイプ、下にスワイプ、左にスワイプ、右にスワイプの 6種類です。
  5. Update メソッドで、現在のページの滑らかなページめくりを追加します。

    private void Update()
    {
    case ViewMode.Preview:
    scrollRect.horizontalScrollbar.value = Mathf.Lerp(scrollRect.horizontalScrollbar.value, scrollStep * currentPage, Time.deltaTime * scrollSpeed); // move the content until the current page is displayed
    break;
    }

  6. プロジェクトを実行します。左右にスクロールして画像を閲覧できるギャラリーが表示されます。
Ugallery_10.gif
ギャラリーをスクロール

ギャラリーの要素とのインタラクションと「クリック」イベント

  1. 新しいスクリプト、ImageItem.cs を作成します。このスクリプトで、ギャラリー内の画像とのインタラクションを説明します。MonoBehaviour クラスではなく Selectable クラスから継承することにより、Unity の UIシステムのインタラクションに関する一般的なルールに準拠します。
  2. Unity で、ImageItem にスクリプトをドラッグ アンド ドロップし、ポインターの位置に応じた明るさを設定します。

    Ugallery_11.png
    明るさの設定

  3. UI の要素とのインタラクションには、ユーザーがどの要素を指しているか把握する必要があります。マウス ポインターを使用する場合、処理は、Unity の内蔵コンポーネントである Standalone Input ModuleEventSystemGraphic Raycaster が使われます。ここでは、カスタム ポインターを使用するため、インタラクションの論理回路を見つけ出す必要があります。マウス ポインターと同様、ポインターの下に位置するインターフェイス要素を得るために、キャンバスやすべての要素を突き抜けて突き抜けたすべてのアイテムのリストを戻す UI システムに対して RayCast を使用します。

    RayCast を実装するには、光線を出すカメラ、現在の要素を保存する変数、ユーザーが指定するポイント (PointerEventData) に関するデータを保存する変数、RayCast 一時結果ストレージとなる要素の一覧が必要です。

    [Header("Raycasting")]
    [SerializeField]
    Camera cam;
    ImageItem selectedButton;
    PointerEventData eventData = new PointerEventData(null);
    List<RaycastResult> raycastResults = new List<RaycastResult>();

  4. ポインターが有効なら、ユーザーがどの要素を指しているのかを判断できます。まず、レイの原点を定義します。画面に対するポインターの位置を提示します。その際、WorldToScreenPoint カメラ メソッドを呼び出します。同様に、後で必要となるポインターのオフセットを定義します。以前のフレームからRayCast の要素の一覧を消去し、RaycastAll を使用して、レイキャストを行います。インタラクションのための ImageItem コンポーネントを含む要素が見つかるまで繰り返し一覧を実行します。

    if (!active)
    return;
    Vector2 pointOnScreenPosition = cam.WorldToScreenPoint(transform.position);
    eventData.delta = pointOnScreenPosition - eventData.position;
    eventData.position = pointOnScreenPosition;
    raycastResults.Clear(); // clear the raycasting results from the previous frame
    EventSystem.current.RaycastAll(eventData, raycastResults);
    ImageItem newButton = null;
    for (int q = 0; q < raycastResults.Count && newButton == null; q++)
    newButton = raycastResults[q].gameObject.GetComponent<ImageItem>();
    if (newButton != selectedButton)
    {
    if (selectedButton != null)
    selectedButton.OnPointerExit(eventData);
    selectedButton= newButton;
    if (selectedButton != null)
    selectedButton.OnPointerEnter(eventData);
    }

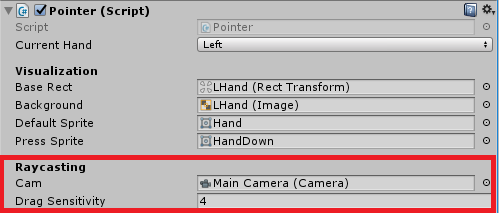
  5. Unity で、レイキャストに使用するカメラを[Pointer]で設定します(RHand и LHand > Pointer > Raycasting > Cam > Main Cam)。

    Ugallery_12.png
    レイキャスト設定

  6. Pointer.cs スクリプトで「押す/離す」イベントの操作を追加します。クリック イベントが実行されるのは、ユーザーの手が dragSensitivity で指定されているより遅い速度で動いた場合です。ユーザーが手を早く動かした場合などに、実在しない (ファントム) クリックを除外するのに役立ちます。

    else if (selectedButton != null)
    {
    if (press)
    {
    if (eventData.delta.sqrMagnitude < dragSensitivity)
    {
    eventData.dragging = true;
    selectedButton.OnPointerDown(eventData);
    }
    }
    else if (eventData.dragging)
    {
    eventData.dragging = false;
    selectedButton.OnPointerUp(eventData);
    }
    }

  7. ImageItem.cs script で「クリック」イベントを定義します。

    public class ImageItem :Selectable
    {
    public delegate void Click(ImageItem currentItem);
    public event Click OnClick;
    }

  8. OnPointerUp メソッドのオーバーライド: 握った手を開くと、クリックがカウントされます。

    public override void OnPointerUp(PointerEventData eventData)
    {
    OnClick(this);
    InstantClearState();
    base.OnPointerUp(eventData);
    }

  9. Start メソッドの GalleryControl.cs スクリプトで、canvasGroup のフィールドを追加し、全画面表示のパラメーターを定義します。

    [SerializeField] CanvasGroup canvasGroup;
    [Header("View")]
    [SerializeField] RectTransform viewRect;
    Vector2 defaultPosition;
    [Range(0.1f, 16f)]
    [SerializeField] float animationSpeed = 2;
    ImageItem selectedItem = null;
    bool animated = false;
    float t = 0; // current animation time

  10. 「クリック」イベントを登録します。

    for (int i = 0; i < imagesOnCurrentPage.Length; i++)
    {
    ...
    currentImage.sprite = spriteCollection[imageIndex];
    imageIndex++;
    ImageItem currentImageItem = currentItem.GetComponent<ImageItem>();
    currentImageItem.OnClick += CurrentImageItem_OnClick;
    }

  11. モード チェックの追加: プレビュー モードからビュー モードへの切り換えが行われます。ユーザーが画像をクリックすると、画像は viewRect に移動し、Scroll Rect 内の他の画像のようにフェードアウトしません。canvasGroup.interactable 変数を使用すると、コンテンツから引き離した画像がインタラクティブではなくなります (canvasGroup スクリプトのアクションは、すべての子要素 (クラス) にも適用されます)。

    private void CurrentImageItem_OnClick(ImageItem currentItem)
    {
    if (currentViewMode == ViewMode.Preview)
    {
    &#0;
    currentViewMode = ViewMode.View;
    selectedItem = currentItem;
    canvasGroup.interactable = false;
    selectedItem.interactable = false;
    selectedItem.transform.SetParent(viewRect, true);
    defaultPosition = selectedItem.transform.localPosition;
    }
    }

  12. In the Update メソッドで、ギャラリーの特長を指定します。表示モードをクリックして切り替えると、画像が全画面モードで開きます。

    private void Update()
    {
    switch (currentViewMode)
    {
    case ViewMode.View:
    if (t < 1)
    {
    // Add the delta multiplied by the specified speed to the current animation time
    t += Time.deltaTime * animationSpeed;
    // Shift the transparency of the remaining pictures to 0 exponentially from t
    canvasGroup.alpha = Mathf.Lerp(canvasGroup.alpha, 0, t);
    // Stretch the picture to the full screen size exponentially from t
    selectedItem.image.rectTransform.sizeDelta = Vector2.Lerp(selectedItem.image.rectTransform.sizeDelta, pageSize, t);
    // Move the picture to the center of the screen exponentially from t
    selectedItem.transform.localPosition = Vector2.Lerp(selectedItem.transform.localPosition, Vector2.zero, t);
    }
    break;
    ...
    }
    }

  13. プレビュー モードが選択されている場合のアニメーションを追加します。

    ...
    case ViewMode.Preview:
    if (animated)
    {
    if (t > 0)
    {
    // Roll back the time from 1 to 0
    t -= Time.deltaTime * animationSpeed;
    canvasGroup.alpha = Mathf.Lerp(1, canvasGroup.alpha, t);
    selectedItem.image.rectTransform.sizeDelta = Vector2.Lerp(defaultSize, selectedItem.image.rectTransform.sizeDelta, t);
    selectedItem.transform.localPosition = Vector2.Lerp(defaultPosition, selectedItem.transform.localPosition, t);
    selectedItem.transform.localRotation = Quaternion.Lerp(Quaternion.identity, selectedItem.transform.localRotation, t);
    selectedItem.transform.localScale = Vector3.Lerp(Vector3.one, selectedItem.transform.localScale, t);
    }
    else
    {
    // Make the image a child of the content
    selectedItem.transform.SetParent(content, true);
    // Return interactivity to all elements
    selectedItem.interactable = true;
    canvasGroup.interactable = true;
    // Discard the selected image and stop the animation
    selectedItem = null;
    animated = false;
    }
    }
    else
    scrollRect.horizontalScrollbar.value = Mathf.Lerp(scrollRect.horizontalScrollbar.value, scrollStep * currentPage, Time.deltaTime * scrollSpeed);
    break;

  14. 表示モードを終了した場合の動作を追加します。

    private void NuitrackManager_onNewGesture(nuitrack.Gesture gesture)
    {
    case ViewMode.View:
    // If there was a swipe up, then switch to the preview mode and start the animation
    if (gesture.Type == nuitrack.GestureType.GestureSwipeUp)
    {
    currentViewMode = ViewMode.Preview;
    animated = true;
    }
    break;
    }

  15. Unity で、[キャンバス グループ]コンポーネントを追加します。これは、画像をビュー モードで開くときに背景を透過にするために必要となります。[Unity] > [Scroll View] > [コンポーネント追加] > [キャンバス グループ]コマンドを使用します。[キャンバス]で、背景色を黒に設定します (ギャラリーの写真が映えるため)。キャンバスに[パネル]オブジェクトを追加すると、ビュー モードの画像を入れるための空の長方形が利用できるようになります。[キャンバス] > [GameObject] > [UI] > [パネル]を選択し、画像要素を削除します。ギャラリーやポインターを正しく表示するには、[キャンバス]に以下の階層が必要です。
    • スクロール ビュー
    • ビュー
    • 右手
    • 左手
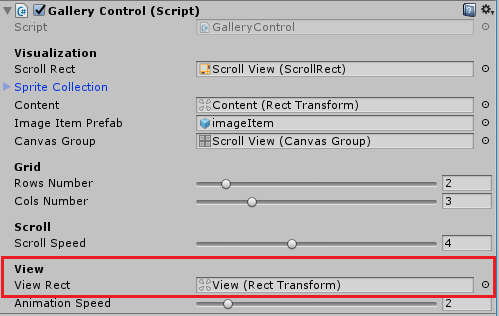
  16. ビューモードで画像を表示する領域を、キャンバスにドラッグ アンド ドロップします。[Gallery Control] > [View Rect] > [View (Rect Transform)] を使用します。

    Ugallery_13.png
    ビューの枠 (長方形) を設定

  17. プロジェクトを実行します。画像は、カーソルの位置に応じて、色が変化します。クリック後に、画像がビュー モードで開きます。上へスワイプで、画像を閉じることができます。
Ugallery_14.gif
インタラクティブなギャラリー

ビュー モードで画像をドラッグ、ズーム、回転

  1. ImagItem.cs スクリプトでは、 One-Touch と Multi-Touch イベントの操作を追加します。現在のタッチ、最初の位置、回転、画像の縮小率を保存するフィールドを追加します。

    List<PointerEventData> touches = new List<PointerEventData>();
    Vector3 startCenter;
    Vector3 startPosition;
    Vector3 startScale;
    float startHandDistance;
    float startAngle;
    Quaternion startRotation;

  2. OnPointerExit メソッドのオーバーライド: 手が画像の外にある場合、タッチがキャンセルされます。

    public override void OnPointerExit(PointerEventData eventData)
    {
    touches.Remove(eventData);
    base.OnPointerExit(eventData);
    }

  3. 画像の状態の変更は、キャプチャの開始から現時点での変更に基づいて計算されるので、最初の画像の状態を保存するためのメソッドを見極めます。

    void UpdateInitialState()
    {
    if (OneTouch)
    {
    startCenter = touches[0].position;
    }
    else if (MultiTouch)
    {
    startCenter = (touches[0].position + touches[1].position) / 2;
    startHandDistance = (touches[0].position - touches[1].position).magnitude;
    Vector3 pointRelativeToZero = touches[1].position - touches[0].position;
    startAngle = Mathf.Atan2(pointRelativeToZero.x, pointRelativeToZero.y) * Mathf.Rad2Deg;
    }
    startScale = transform.localScale;
    startPosition = transform.localPosition;
    startRotation = transform.localRotation;
    }

  4. OnPointerDown メソッドのオーバーライド: 手を押し出した場合、タッチが追加されます。

    public override void OnPointerDown(PointerEventData eventData)
    {
    if (!touches.Contains(eventData))
    {
    touches.Add(eventData);
    UpdateInitialState();
    }
    base.OnPointerDown(eventData);
    }

  5. OnPointerUp メソッドのオーバーライド: 握っていた手を開くと、画像のホールドが解除されます。

    public override void OnPointerUp(PointerEventData eventData)
    {
    touches.Remove(eventData);
    UpdateInitialState();
    ...
    }

  6. IDragHandler インターフェイスのサポートを追加することで、ドラッグ アンド ドロップを操作できます。

    注意
    このプロジェクトでは、手だけでなく、マウス ポインターで画像を移動することができます。
  7. OnDrag メソッド (画像のドラッグ、スケーリング、回転を実行) を定義します。ポインターが 1つの場合は、ドラッグ アンド ドロップのみ利用できます。ポインターが 2つの場合は、すべてのアクションが利用できます。

    public void OnDrag(PointerEventData eventData)
    {
    if (interactable || !eventData.dragging)
    return;
    if(OneTouch)
    {
    // Take the initial saved position and add the offset from that moment
    Vector3 currentCenter = touches[0].position;
    transform.localPosition = startPosition + (currentCenter - startCenter);
    }
    else if(MultiTouch)
    {
    // Calculate the center between two hands and add the center offset from start of capture
    Vector3 currentCenter = (touches[0].position + touches[1].position) / 2;
    transform.localPosition = startPosition + (currentCenter - startCenter);
    // Calculate the change in distance between two hands
    float currentHandDistance = (touches[0].position - touches[1].position).magnitude;
    transform.localScale = startScale * Mathf.Abs(currentHandDistance / startHandDistance);
    // Calculate the angle of one hand relative to the other
    Vector3 pointRelativeToZero = touches[1].position - touches[0].position;
    float angle = Mathf.Atan2(pointRelativeToZero.x, pointRelativeToZero.y) * Mathf.Rad2Deg;
    // Apply rotation
    transform.localRotation = startRotation * Quaternion.Euler(0, 0, startAngle - angle);
    }
    }

  8. Pointer.cs スクリプトで、ドラッグ アンド ドロップを実行するためには、現在の要素の OnDrag メソッド呼び出しを追加します。

    if (press)
    selectedButton.OnDrag(eventData);

  9. プロジェクトを実行します。プレビュー モードの画像は、片方または両方の手でドラッグを行うことができ、両方の手を使って回転とスケーリングを行うことができます。

    Ugallery_15.gif
    フクロウがこちらに向かってきます!

    おめでとうございます。ジェスチャで操作可能なギャラリーの完成です!