Nuitrack 1.5.0
3D スケルトン トラッキング ミドルウェア
 すべて クラス 名前空間 関数 変数 Typedefs 列挙型 列挙子 プロパティ イベント グループ ページ
Zombie Nightmare (Oculus Rift)

このチュートリアルでは、Oculus Rift と Nuitrack を使用したプロジェクトの作成方法を紹介します。"Zombie Nightmare"という VR ゲームを作成します。プレイヤーの目標は、あちこちからランダムに出現するゾンビをすべて殺すことです。プレイヤーの命 (生き返れる回数) は無限ではありません。プレイヤーがゾンビに噛まれると、プレイヤーの健康状態がわずかに悪化し、最終的には死にます。一見平凡なプロジェクトの何が魅力的なのでしょうか?それは、プレイヤーがゾンビを破壊するのに手ではなく、を使うということです。Oculus Rift プレイ時に、足を使ったことはあるでしょうか?ほとんどの人はないはずです!この足を使うという夢が、Nuitrack によってかなうのです!

Uzombies_10.gif

プロジェクトに必要なものは多くはありません。

ハードウェア:

  • 強力な PC (最小システム要件を確認ください)
  • Oculus Rift (ヘッドセット + 2 つのセンサー + Oculus Touches)
  • 深度センサー (サポートしているカメラの一覧の確認は Webサイトで確認)

ソフトウェア:

  • Nuitrack (ここでは、バージョン 0.23.1 を使用)
  • Windows (ここでは Windows 10 を使用)
  • Oculus Integration パッケージを Unity Asset Store から入手
  • Nuitrack Skeleton Tracking パッケージをUnity Asset Store から入手
  • Unity (2017.4 以上)

完成済みプロジェクトは、 Nuitrack SDK: Unity 3D > NuitrackSDK.unitypackage > Tutorials > Zombie Nightmare (RIFT) です。

プロジェクトのセットアップ

  1. 新しいプロジェクトを作成し、任意の名前を付けます (例えば、「使用した素晴らしいゾンビゲーム」)
  2. Nuitrack Skeleton Tracking パッケージ を Unity Asset Store からダウンロードし、プロジェクトにインポートします。[Assets] > [Import package] > [Custom Package…]を選択します。
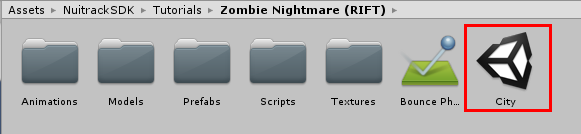
  3. "City"のシーンを開きます (Nuitrack SDK > Tutorials > Zombie Nightmare (RIFT) > City)。ゾンビによる大惨事は、発展した大都市で起きるかもしれません。どこで発生するかは誰にもわかりません....

    Uzombies_2.png

  4. Oculus Integration パッケージ を Unity Asset Store からダウンロードします。含まれているのは、Advanced Oculus Rift、Touch、レンダリング 、オーディオ、ソーシャル、アバター の Gear VR サポートとプロジェクトへのインポートです。
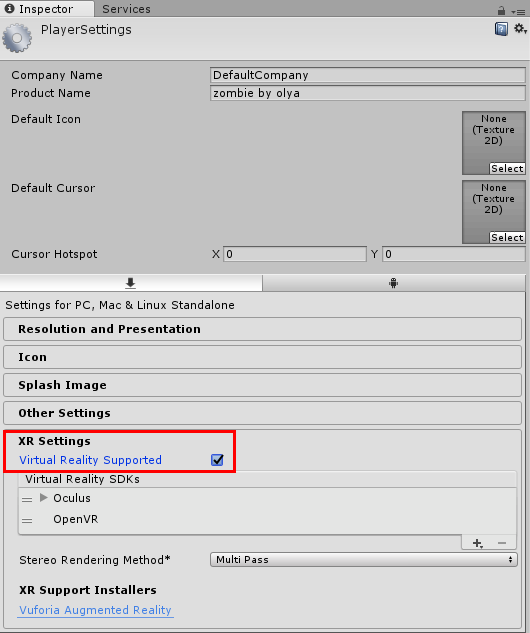
  5. Unity の設定で、VR サポートを有効にします (Build Settings > Player Settings > XR Settings > Virtual Reality Supported)。

    Uzombies_3.png

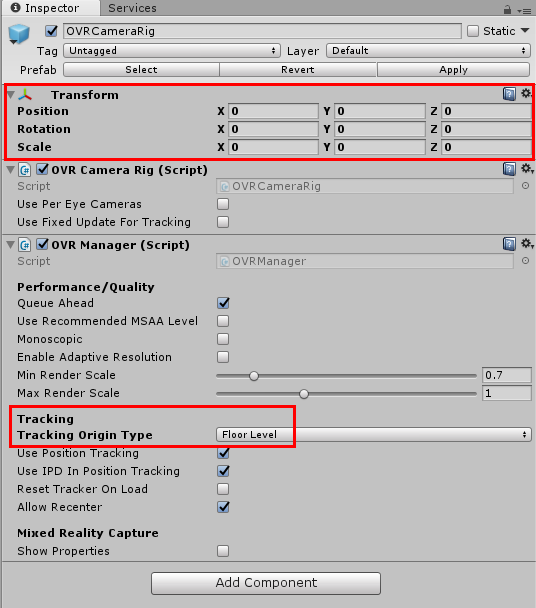
  6. OVRCameraRig プレハブをシーンにドラッグ アンド ドロップします(Assets > Oculus > VR > Prefabs)。これがプレイヤーの頭になります。Position/Rotation/Scale を (0, 0, 0) に設定すると、プレイヤーをシーンの真ん中に立たせることができます ( このゲームの主役でありヒーローなので真ん中に)。Tracking Origin Type の設定を、OVRCameraRig プレハブの設定で行います。カメラがプレイヤーの高さに位置するように、OVRManager > Tracking > Tracking Origin Type > Floor Level で設定を行います。

    Uzombies_4.png

  7. LocalAvatar プレハブをシーンにドラッグ アンド ドロップします(Assets > Oculus > Avatar > Content > Prefabs)。これがプレイヤーの胴体になります。この胴体にひきつけられたゾンビの大群が押し寄せてきます。
  8. NuitrackScripts プレハブをシーンにドラッグ アンド ドロップします (Nuitrack SDK > Nuitrack > Prefabs)。スケルトン トラッキングに必要なモジュールとして、[Skeleton Tracker Module On」、[User Tracker Module On]チェックボックスをオンにします。

    Uzombies_5.png

プレイヤーの足を作成

  1. 新しいスクリプト、NuitrackLegs.cs を作成します。このスクリプトでは、スケルトン トラッキングの定義とプレイヤーの足の作成を行います。
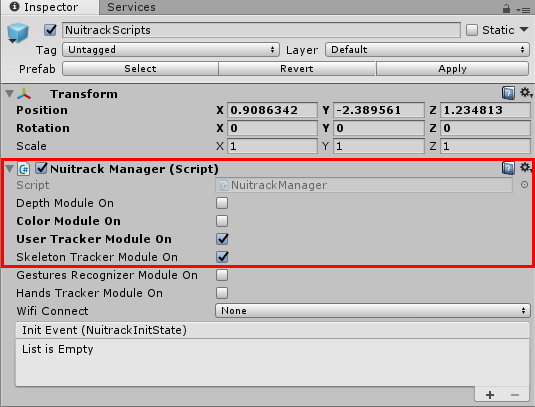
  2. 必要なフィールドを追加します。「オフセット」とは、Oculus Rift (頭) と Nuitrack (その他のスケルトン関節) からのデータに基づいて計算したスケルトンのオフセットです。

    public class NuitrackLegs :MonoBehaviour
    {
    [SerializeField] Transform head;
    [SerializeField] Rigidbody leftLeg, rightLeg;
    [SerializeField] Transform floor; // correct the position of user's legs
    Vector3 offset;
    Quaternion q180 = Quaternion.Euler(0f, 180f, 0f); // mirror the joint position
    Vector3 newPosLeft, newPosRight; // position of the left leg and right leg
    }

  3. Update で、ユーザーのスケルトンが検出された場合に処理を行います。

    void Update()
    {
    //If a skeleton is detected, process the model
    if (CurrentUserTracker.CurrentSkeleton != null) ProcessSkeleton(CurrentUserTracker.CurrentSkeleton);
    }

  4. ProcessSkeleton で、オフセットを考慮して、左足と右足の位置を計算します (詳細については、「スケルトンを使用してアバターに生気を」チュートリアルをご覧ください)。トラッキング時に Unity の床のレベルより下に足がある場合 (ユーザーが座っている場合など)、位置が自動的に修正され、ユーザーの足が地下にあるということにはなりません。

    void ProcessSkeleton(nuitrack.Skeleton skeleton)
    {
    newPosLeft = q180 * (CalibrationInfo.SensorOrientation * (0.001f * skeleton.GetJoint(nuitrack.JointType.LeftAnkle).ToVector3())) + offset;
    newPosRight = q180 * (CalibrationInfo.SensorOrientation * (0.001f * skeleton.GetJoint(nuitrack.JointType.RightAnkle).ToVector3())) + offset;
    if (newPosLeft.y < floor.position.y)
    {
    newPosLeft = new Vector3(newPosLeft.x, floor.position.y, newPosLeft.z);
    }
    if (newPosRight.y < floor.position.y)
    {
    newPosRight = new Vector3(newPosRight.x, floor.position.y, newPosRight.z);
    }
    }

  5. スケルトン全体のオフセットを計算します。Nuitrack によって検出される頭の関節が、Oculus Rift によって検出される頭の位置からひいて計算されます。

    void ProcessSkeleton(nuitrack.Skeleton skeleton)
    {
    ...
    offset = head.position - (q180 * (CalibrationInfo.SensorOrientation * (0.001f * skeleton.GetJoint(nuitrack.JointType.Head).ToVector3())));
    }

  6. FixedUpdate で、ユーザーの足の座標を適用します。Update ではなく FixedUpdate を使用するのは、Unity 物理特性がこのメソッドでしか処理されないからです。

    void FixedUpdate ()
    {
    leftLeg.MovePosition(newPosLeft);
    rightLeg.MovePosition(newPosRight);
    }
    注意
    MovePosition メソッドについての詳細は、Unity Webサイトをご覧ください。
  7. スクリプトを[LocalAvatar]プレハブにドラッグ アンド ドロップします。
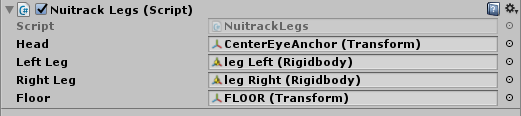
  8. プレハブ設定で次のフィールドを設定します。

    Head - CenterEyeAnchor (OVRCameraRig プレハブから)
    LeftLeg - leg Left (階層から)
    RightLeg - leg Right (階層から)
    Floor - FLOOR (階層から)

    Uzombies_6.png

  9. プロジェクトを実行します。素敵な青いスニーカーを履いた足が表示されます。動きは Nuitrack によってトラッキングされます。ユーザー セグメントを含む「画面 (平面)」が表示され、FPS の確認を行い、ユーザーの足がフレーム内に収まっているかを把握する助けとなります。

    Uzombies_1.gif
    注意
    足の関節だけでなく、Nuitrack が検出する 21箇所すべての関節を使用できます (一覧を確認するには、Nuitrack 公式 Webサイトをご覧ください)。オフセットを忘れずに追加してください!

ゲームの理論を決定

  1. 新しいスクリプト、GameManager.cs を作成します。このスクリプトでは、ゲームの終了と再開に加え、ゾンビが出現するタイミングを定義します。
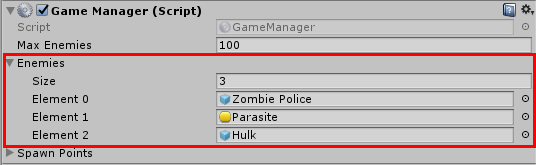
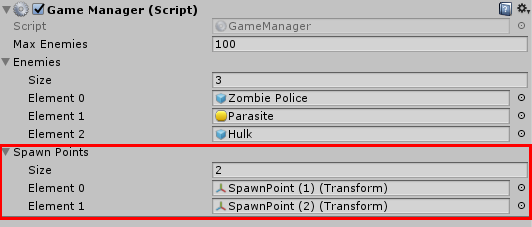
  2. 必要なフィールドとして、生成するゾンビの最大数、敵に関する配列、ゾンビの生成ポイントに関する配列、プレイヤー死亡後の再開時間、生成したゾンビの数カウンターを追加します。

    public class GameManager:MonoBehaviour
    {
    [SerializeField] int maxEnemies = 100;
    [SerializeField] GameObject[] enemies;
    [SerializeField] Transform[] spawnPoints;
    float restartTime = 5;
    int enemiesCount = 0;
    }

  3. Start では、常に繰り返されるSpawnEnemy メソッドの生成を、開始から 3秒経過後から、0.2秒毎に定義します。生成されるゾンビの最大数に達した場合、メソッドは実行されなくなります。再生前に、各ゾンビのサイズが微調整されます (すべて同じサイズにならないように)。

    void Start()
    {
    InvokeRepeating("SpawnEnemy", 3, 0.2f);
    }
    void SpawnEnemy()
    {
    if (enemiesCount >= maxEnemies)
    return;
    float randomSize = Random.Range(0.2f, 0.3f); // zombie size
    enemies[Random.Range(0, enemies.Length)].transform.localScale = Vector3.one * randomSize; // set the zombie size
    Instantiate(enemies[Random.Range(0, enemies.Length)], spawnPoints[Random.Range(0, spawnPoints.Length)].position, Quaternion.identity); // spawn zombies
    enemiesCount++;
    }
    注意
    InvokeRepeating メソッドは、該当するメソッドを一定間隔ごとに繰り返し呼び出します。
  4. GameOver メソッドは、一定時間経過後にゲームを新しいレベルで再開するRestart メソッドの実行を開始します。

    public void GameOver()
    {
    StartCoroutine(Restart());
    }
    IEnumerator Restart()
    {
    yield return new WaitForSeconds(restartTime);
    Application.LoadLevel(Application.loadedLevel);
    }

  5. Unity で空のオブジェクトを作成し (GameObject > Create Empty)、GameManagerと名前を付けます。スクリプトをこのオブジェクトにドラッグ アンド ドロップします。
  6. GameManager オブジェクトの設定の[敵]フィールドをゾンビで埋めます。そのために、Tutorials > Zombie Nightmare (RIFT) >Prefabs (Parasite, Hulk, Zombie Police) を使用します。

    Uzombies_8.png

  7. ゾンビの生成ポイントも設定します。設定には、Spawn Points > SpawnPoint(1)(Transform)、 SpawnPoint(2)(Transform) (階層から) を使用します。

    Uzombies_9.png

  8. プロジェクトを実行します。シーンに、ゾンビがランダムに出現します(ちょっとおかしな光景です)。
Uzombies_7.gif

プレイヤーとゾンビを作成

  1. 小さな世界をゾンビから守る救出者を作成する番です!新しいスクリプト、Player.cs を作成します。
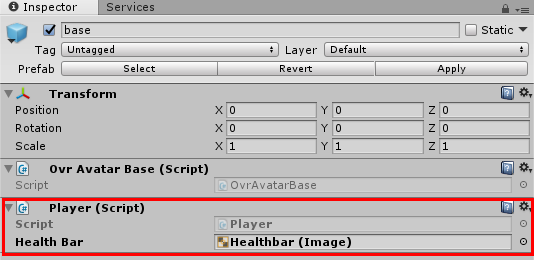
  2. 必要なフィールド、健康状態のスコアとステータスバーを追加します。

    public class Player :MonoBehaviour
    {
    float health = 100;
    [SerializeField] UnityEngine.UI.Image healthBar;
    }

  3. GetDamage メソッドでは、ゾンビがプレイヤーに与えるダメージを設定します。プレイヤーの命が残り 0 の場合、remaining コードは実行されません。プレイヤーがゾンビにかまれると、健康状態が悪化 (健康状態のステータスバーが赤くなる)か死亡します。プレイヤーの死亡後 (Death メソッド)、レベルは 3秒後に再開します。

    public void GetDamage(float damage)
    {
    if (health <= 0)
    return;
    health -= damage;
    if(health <= 0)
    {
    health = 0;
    FindObjectOfType<GameManager>().GameOver();
    }
    healthBar.fillAmount = health / 100;
    }

  4. スクリプトを localAvatar - base にドラッグ アンド ドロップし、[Canvas]から healthbar を追加します。

    Uzombies_11.png

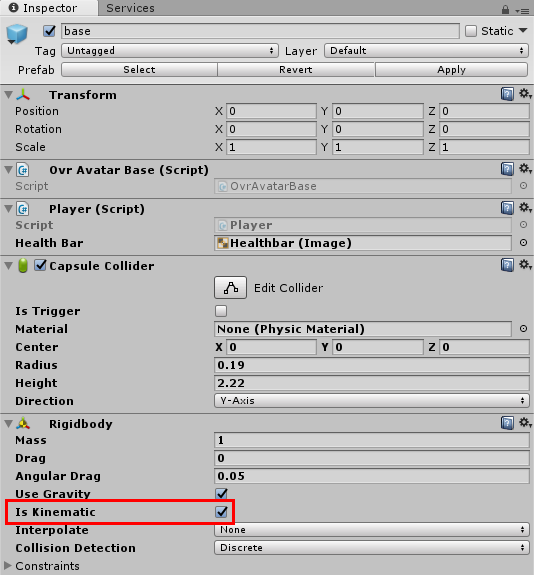
  5. [base]を選択し、[Capsule Collider] と[Rigidbody] を追加し、[Is Kinematic]チェックボックスをオンにすると capsule が落ちません。設定を次のスクリーンショットに示されている通りに設定すると、ゾンビがプレイヤーを取り囲みます。

    Uzombies_12.png

  6. いよいよ、ゾンビその物を作成する番です。新しいスクリプト、ZombieController.cs を作成します。このスクリプトで、ゲーム内でのゾンビの動きを説明します。
  7. 必要なフィールドを追加します。

    public class ZombieController :MonoBehaviour
    {
    [SerializeField] int hp = 100; // health of a zombie
    [SerializeField] float damage = 0.01f; // damage from a zombie
    [SerializeField] float speed = 1; // speed of a zombie
    [SerializeField] Transform floorChecker; // used to switch Ragdoll
    [SerializeField] Animator animator; // used to control the animation of zombies
    [SerializeField] float attackDistance = 0.7f; // attacking distance of a zombie
    [SerializeField] Transform modelTransform; // used to process Ragdoll
    float standTime = 0, flyTime = 0; // time on the ground and in flight
    bool isOnGround = false; // check whether the zombie is on the ground or not
    bool isFly = false; // check whether the zombie is in flight or not
    bool isRagdoll = true; // is Ragdoll on?
    bool canAttack = false, prevCanAttack = false; // can a zombie attack?
    Player target; // target for a zombie attack (player)
    Rigidbody rb;
    Rigidbody[] rigidbodyRagdoll;
    Collider[] colliderRagdoll;
    Vector3 localPosition; // modelTransform position of a zombie
    }

  8. Awake メソッドでは、ゾンビの localPositionmodelTransform を取得し、ゾンビの子オブジェクト開始位置の局所座標を保存することで、ラグドールが完了した際に、この子オブジェクトが元の位置に戻れるようにラグドール化されます。

    void Awake()
    {
    localPosition = modelTransform.localPosition;
    }

  9. Start で、Ragdoll 処理で後で必要になる、ゾンビの体のパーツのRigidbodyColliders と、ゾンビの胴体の Rigidbody のレファレンスを取得します。Ragdoll を無効にし、ゾンビのターゲットとなるプレイヤーを指定します。

    void Start()
    {
    rigidbodyRagdoll = GetComponentsInChildren<Rigidbody>();
    colliderRagdoll = GetComponentsInChildren<Collider>();
    rb = GetComponent<Rigidbody>();
    SwitchRagdoll(false); // disable ragdoll
    target = FindObjectOfType<Player>(); // find the target for zombies
    }

  10. switchRagdoll メソッドのゾンビ Ragdoll 切り替えを処理します。Ragdoll が有効になるのは、プレイヤーがゾンビを蹴り、ゾンビが鳥のように空を飛んでいくときです。Ragdoll を使用することで、ただ空を歩いているように去っているのではなく、本当に飛んでいきます。Ragdoll は、ゾンビが地面に着地後、約2秒間地面に倒れている場合に無効になります。

    void SwitchRagdoll(bool ragdoll)
    {
    if (ragdoll != isRagdoll)
    {
    if (ragdoll) // If ragdoll is off
    {
    for (int i = 0; i < rigidbodyRagdoll.Length; i++)
    {
    rigidbodyRagdoll[i].isKinematic = false; // Physics is turned on
    rigidbodyRagdoll[i].velocity = rb.velocity; // When ragdoll is on, the speed of the main Rigidbody component is passed to the child Rigidbody components so they continue to fly according to physics
    }
    }
    else // If ragdoll is off
    {
    // Return position and rotation to original state when Ragdoll is over
    modelTransform.localRotation = Quaternion.identity;
    transform.position = modelTransform.position; // When Ragdoll is over, the model base object is brought back to Ragdoll coordinates
    modelTransform.localPosition = localPosition; // Move the child model to its original local coordinates
    for (int i = 0; i < rigidbodyRagdoll.Length; i++)
    {
    rigidbodyRagdoll[i].isKinematic = true;
    }
    }
    rb.isKinematic = ragdoll; // Switch the basic Ragdoll kinematics
    for (int i = 0; i < colliderRagdoll.Length; i++)
    {
    colliderRagdoll[i].enabled = ragdoll; // Switch the Ragdoll colliders
    }
    GetComponent<Collider>().enabled = !ragdoll; // Switch the base collider
    animator.enabled = !ragdoll; // Switch the animator.When Ragdoll is turned on, еру animator is switched off.
    }
    isRagdoll = ragdoll;
    }

  11. IsOnGround メソッドでは、ゾンビが地面に立っているかどうかを確認します。それぞれのゾンビにある FloorChecker オブジェクトにより、ゾンビの位置を確認できます。このオブジェクトは常に下を向いており、床の位置を確認するためのレイを発射するポイントとして使用することができます。レイを作成して、設定を行います。

    bool IsOnGround() // Is the zombie on the ground?
    {
    floorChecker.rotation = Quaternion.identity; // Fix the object rotation
    Vector3 direction = -floorChecker.up; // Downward direction
    float maxDistance = 0.5f;
    Ray ray = new Ray(floorChecker.position, direction); // Create a ray
    return Physics.Raycast(ray, maxDistance); // Return value from the ray
    }

  12. Update で、ゾンビが攻撃できる時と攻撃を始める時を定義します。また、ゾンビの状況 (地面を歩いている、飛ばされて倒れている、空中) に応じた行動パターンも定義します。幸い、ゾンビはプレイヤーに蹴り飛ばされた後にのみ空中を飛べます。

    void Update()
    {
    if (hp <= 0)
    return; // If the zombie is dead, the code below is not executed
    isOnGround = IsOnGround();
    canAttack = isOnGround && Vector3.Distance(transform.position, target.transform.position) <= attackDistance && hp > 0; // If the zombie is on the ground, the distance to the player is sufficient and he has enough lives, it's time to attack
    if (canAttack != prevCanAttack) // Called just once
    {
    prevCanAttack = canAttack;
    StartCoroutine(Attacking());
    }
    animator.SetBool("Attacking", canAttack); // Start "attacking" animation
    if (isOnGround)
    {
    if (standTime > 2.0f) // Zombie gets up in 2 seconds
    {
    if(isRagdoll) // If Ragdoll was off, turn it on
    SwitchRagdoll(false);
    transform.LookAt(target.transform); // Zombie turns to the player
    rb.AddForce(transform.forward * speed); // And runs!
    }
    standTime += Time.deltaTime;
    if (isFly) // If the zombie has flown and fallen
    {
    isFly = false;
    GetDamage((int)(flyTime * 10)); // When the zombie falls, he gets damaged depending on the "flight time"
    flyTime = 0;
    }
    }
    else
    {
    standTime = 0;
    isFly = true; // If the zombie is flying
    flyTime += Time.deltaTime;
    if (flyTime >= .1f && !isRagdoll) // If the zombie flies for more than 0.1 sec, turn the ragdoll on
    SwitchRagdoll(true);
    }
    }

  13. IEnumerator Attacking で、1秒待ってから攻撃します (ゾンビは1秒毎に噛みついてきます)。

    IEnumerator Attacking()
    {
    yield return new WaitForSeconds(1.0f);
    if (hp > 0)
    {
    target.GetDamage(damage);
    if (canAttack)
    StartCoroutine(Attacking());
    }
    }

  14. GetDamage メソッドでは、プレイヤーに踏みつけられた、また飛ばされたことによるダメージを定義します。

    void GetDamage(int damage)
    {
    hp -= damage;
    if (hp <= 0)
    Death();
    }

  15. Death メソッドでは、ゾンビの死亡後の動作を定義します。それぞれのゾンビは、SkinnedMeshRenderers を含む配列 (様式の表示に使用) を持っています。配列要素のループ処理を行い、胴体の色を赤で塗りつぶします。Ragdoll オンにします、そうすると、ゾンビが死ぬと倒れるようになります。ゾンビを 5秒後に破壊します。

    void Death()
    {
    SkinnedMeshRenderer[] bodyParts = GetComponentsInChildren<SkinnedMeshRenderer>(); // Search for zombie parts in the array
    for (int i = 0; i < bodyParts.Length; i++)
    {
    bodyParts[i].material.color = Color.red; // Paint the body red
    }
    SwitchRagdoll(true);
    Destroy(gameObject, 5);
    }

  16. OnCollisionEnter メソッドで、プレイヤーがゾンビを足で踏みつけたときのゾンビへのダメージを定義します (プレイヤーには、スニーカーの裏に「Player」としてタグ付けされているコライダーがあり、これを使ってゾンビを踏みつけます)。

    void OnCollisionEnter(Collision collision)
    {
    if (collision.transform.tag == "Player")
    {
    GetDamage(10);
    }
    }

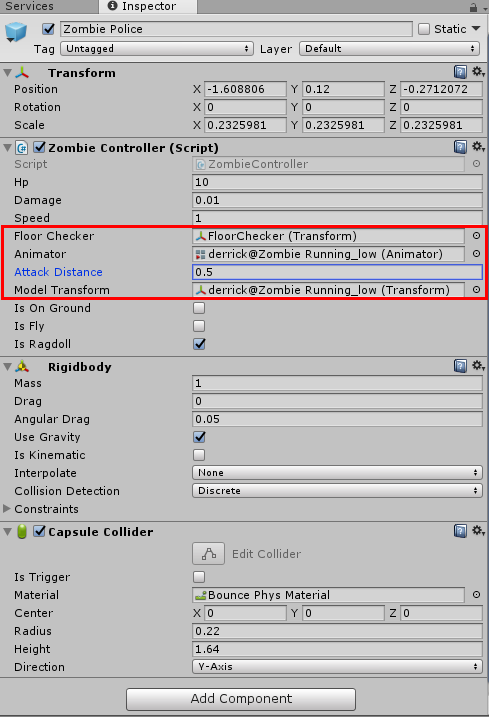
  17. [プレハブ]フォルダーからHulk, Zombie Police, Parasite の各プレハブを選択し、要素を追加します (Add Component > Zombie Controller)。

    Uzombies_13.png
    注意
    簡単に、オリジナルのゾンビを作成することもできます。
    1. ゾンビのモデルをダウンロードします (例えば、この Webサイトが利用できます)。
    2. シーンにドラッグ アンド ドロップします。すべての軸にそって、サイズを 0.2 に設定します。
    3. RigidbodyCapsule Collider を追加します。Capsule Collider のサイズを指定し、物理教材 “Bounce Phys Material” を適用します。
    4. GameObject > 3D Object > Ragdoll... を開きます。ポップアップ ウィンドウで、必要なフィールドを入力します。ゾンビの胴体と手足には、コライダーが追加されました。サイズを手動で調整する必要があるかもしれません。スケルトンの関節が不自然な動きをしないよう、 CharacterJoint 要素の [Enable Projection]チェックボックスもオンにすることをお勧めします。
    5. Animator > Controller を選択し、Controller “Zombie Anim” を適用します。
    6. 空のオブジェクトを作成し、腰 (またはそれに類するもの) の子オブジェクトとし、FloorChecker と名前を付けます。
    7. ZombieController を追加します。フィールドを入力します。
    8. プレハブを保存後に、シーンから削除します。
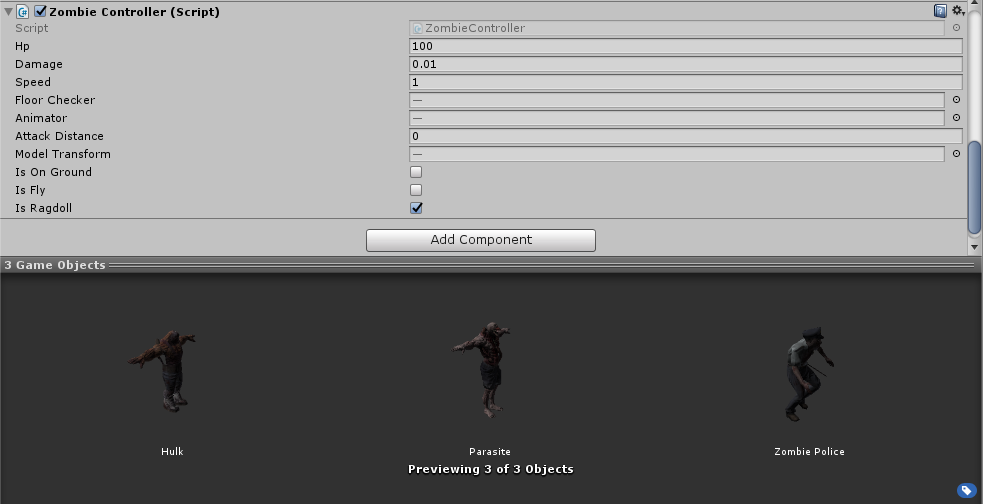
  18. Unity で、ZombieController(Script) オブジェクトをセットアップします。Floor CheckerFloor Checker に、AnimatorAnimator に、ゾンビの子オブジェクトを Model Transform に追加します。それぞれのゾンビには、子オブジェクトが1つだけです。ゾンビ プレハブをシーンにドラッグ アンド ドロップし、[適用]をクリックすると、設定が有効になります。ゾンビからのダメージを、速度や命 (生き返れる回数) を設定することができます。

    Uzombies_14.png

  19. プロジェクトを実行します。たくさんのゾンビがあなたに向かってきて、噛みつきますので、ご注意ください!足から振り落して、踏みつけましょう!
Uzombies_10.gif

このプロジェクトを強力な基盤として、さらに洗練されたゲームを Oculus Rift と Nuitrack Skeleton Tracking ミドルウェアを使用して作成できます。お楽しみください!