To control drag and drop operation without Drag and Drop mode in Preferences, configure Mouse.ini. When you stop moving your palm of the hand drag will start and when you stop again it will be dropped. There is no need to grip your hand with this method. This method (setting) will be very useful when it is hard to grip.
Important: Mouse.ini setting is not available when click mode is set to Click when Stopped.
How to operate (Only 1 mouse button is assigned)
1. Stop your hand on the window of the corresponding application.
2. Drag action will be active and the mouse icon will be displayed. Additional information: When the virtual cursor is displayed on a different window, the operation will not start even if the target application is active.
3. When you move your palm of the hand,the mouse will also move(dragged).
4. When you stop,drag will be released(dropped).
How to toggle mouse features:
The toggle button will not be displayed when there is no need to select, for example when only the LEFT button is valid.
Hint: When you start drag option and release it without moving the position, it will be a "Click" action.
How to operate (When the mouse button has a selection option)
1. Select the virtual mouse button (left, center, right, wheel) displayed on the screen.
2. Stop your hand on the window of the corresponding application.
3. The selected button will be active and the corresponding mouse icon will be displayed.
4. When you move your palm of the hand, the mouse will also move (dragged) with that button pressed.
5. When you stop, the pressed button will be released (dropped).
How to toggle mouse features
To toggle mouse features, when drag mode becomes active, keep still and a menu will appear around the virtual cursor. When the menu appears, move your palm to select the mouse feature. When you first launch the application or a launch just after toggling, the selection menu will be shown.
Virtual mouse button displayed on the left (the left mouse button selected).
When several virtual cursors are defined
When other assist features that activate when you stop your hand such as HybridGesutre.ini or ScrollGesture.ini are also defined, the start of drag defined by Mouse.ini needs to be operated with the steps mentioned below.
Stop your palm
Virtual button selection is displayed -> Keep your palm still
Start drag operation
Destination of Mouse.ini
Save Mouse.ini in C:\ProgramData\aeroTAP folder or the same folder where aeroTAP.exe is saved.
Notes: C:\ProgramData\aeroTAP folder is given priority. Please save with UTF-8 format.
How to modify MOUSE.ini
Description format Application EXE file name{:Caption name},Flag that will disappear when the mouse operation starts (Set valid coordinate for left, top, right, bottom as 320x240) Mouse center mode, Mouse left mode, Mouse right mode, Mouse wheel (0: invalid,1: valid) <<When abbreviated, only the left button will be valid. For the flag to keep the mouse icon displayed (or disappear when operation starts)
0 (default): keep displayed 1: disappear when operation starts
To define the button invalid, set the value to 0. To define the button valid, set values to 1, 3, 5, 9, 17, 32, 33. 0x2, 0x4, 0x8, 0x10 each corresponds to Ctrl, Alt, Shift, Wheel. Value 1: Normal drag (mouse button pressed) Value 3: Drag with Ctrl-key pressed (mouse button pressed) Value 5: Drag with Alt-key pressed (mouse button pressed) Value 7: Drag with Ctrl + Alt-key pressed (mouse button pressed) Value 9: Drag with Shift-key pressed (mouse button pressed) Value 17: Assign distance data to Wheel and also operate zoom in/out by distance To disable, stop at the distance you started from. Value 32: When the distance changes more than 10cm, distance data will be assigned to Touch event (Pinch/Pan) and operate zoom in/out by distance, without dragging. To disable, stop at the distance you started from (Only Windows 10). Value 33: Activates dragging with Touch event. When the distance changes more than 10cm, distance data will be assigned to Touch event (Pinch/Pan) and operate zoom in/out by distance. Drag action will be performed as you move your palm. To disable, stop at the distance you started from (Only Windows 10).
Change drag mouse event to touch event
Example: When you define the action command for the left mouse button to 'T', mouse drag event will be executed as touch event.
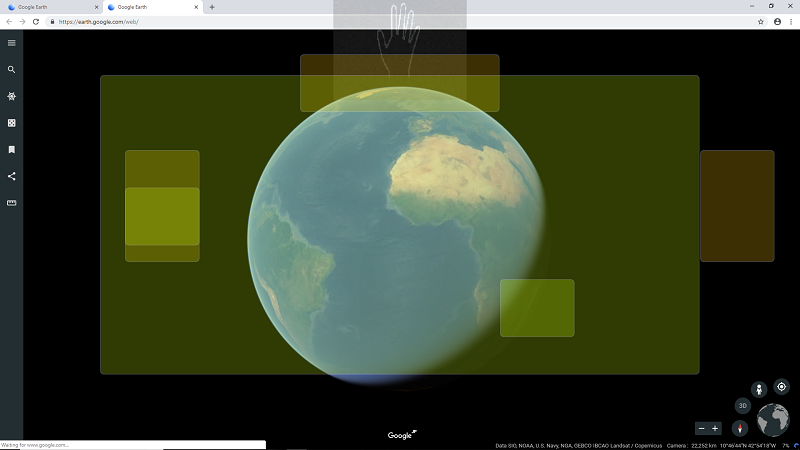
[Chrome.exe:Google Earth] 0,T,0,0
Hint: For more information about Application EXE file name, check "Application name for virtual button setting". Additional information: Caption name can be left blank. Set it when you will make it valid just on a specific screen of an application. Additional information: Area definition can be left blank. Set it when you define the click action to a specific area in the application. Assignable values are coordinates between (0,0)-(320,240). Additional information: Action number can be left blank. Click is set by default. See KeyActionList.exe for the list of action numbers.
Window (define Caption name) After the application name, enter a colon ':' and then the caption name. This example defines to make it valid only when Chrome is opening Google Earth.
Setting the display position First enter 'L' or 'R' to set the display position to the Left, Right. Example: [GoogleEarth.exe] L1,1,1,1
Notes: The coordinates are not the actual resolution of the display.It will be expressed by coordinates of (0,0)-(320,240).
Set valid coordinate When you stop moving your palm, drag mode will be activated. However, by setting a valid coordinate, drag mode will be activated ONLY when you stop at the defined coordinate
Important: When using with another virtual button together, set the effective area not to overlap each other. When stopping the virtual cursor, the virtual button will be displayed, but if the virtual mouse is set to the same area, the virtual mouse will be prioritized and the virtual button can't be used.
Example: [mspaint.exe] (0,200)-(320,240) 0,1,1,0
Assigning virtual mouse buttons to several areas
You can assign virtual buttons for each feature in different areas on the same screen.
Example: The following example shows how to define each area to perform Ctrl + Drag, Alt +Drag, or normal drag when the virtual cursor stops in Meshlab application. For Alt + Drag, the mouse icon will automatically disappear when the operation starts.
Hint: Enter 0,17,0,0 for the last row not only to drag but to zoom according to the distance of your hand. Virtual moue mode can be disabled by stopping your palm at the first position you started from.
Visualization of the virtual mouse button
Enable Display virtual button area option in Advanced Settings tab to display the defined area of the virtual mouse button. It will be displayed when you move to the defined area for the virtual mouse button.
It will also be displayed when switching applications; displaying all areas of the virtual mouse button (virtual scroll bar, virtual button, virtual mouse).
Example: In Google Earth for Chrome that is included in the sample, you can see areas where virtual buttons are set in the image shown below.